QuickTime is a multimedia framework developed by Apple Inc. the software is designed to allow the user to access multiple images, videos, panoramic pictures, sounds, etc. with the click of a few buttons. Initially launched in the year 1991, the latest version is compatible with Mac OS X Snow Leopard and newer versions than that.
When it comes to playing QuickTime on Windows 10, you must know that Apple has ceased to support the OS since 2016. This means that it is not possible for you to run the software on your Windows OS.
However, the guide here shall acquaint you with the alternatives and steps available to install and run QuickTime on your Windows 10.
Checking if you have QuickTime installed in your system
As mentioned earlier, Apple has stopped supporting Windows for running QuickTime on its OS. It is for this reason that there is no chance that you will get the software pre-installed.
However, at times, you might get the software installed as part of any other software or program. For instance, if you have purchased a game, you might get the software as part of the game.
In order to make sure if your system has QuickTime installed or not, follow these steps-
- Go to the taskbar and click on the start button
- Select the Settings option from the menu
- Choose Control Panel in Settings and you will see a window opening in the display to show you the Control Panel of your system
- From here, you can see if the control panel for QuickTime is present or not.
If the control panel for QuickTime is available, here is how you can know about the version of the software-
- Go to the QuickTime Control Panel and double click the panel to open it.
- A window shall pop up with the title QuickTime Settings
- In the Settings windows, go and check the “About QuickTime” option from the drop-down list.
- From here, you shall get all the necessary information regarding which version is available in your system.
Downloading QuickTime on Windows 10
Although Apple does not support Windows for running QuickTime, it sure does makes it slightly easier for the Windows users. They can download and install the software on their system.
If you are to download the software on your system, simply follow the following steps-
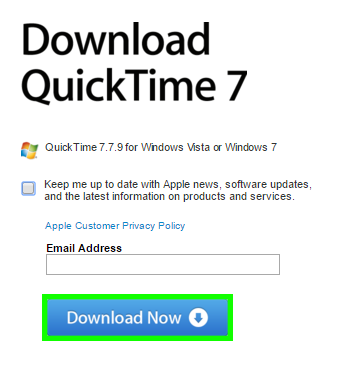
- Go to the QuickTime download page and from there, select the Download Now button. A quick tip here would be to keep your calm upon reading that Apple only supports Windows Vista or Windows 7. Do not panic for the experts have tested the method even on Windows 10 and it sure does work.
- Once it is downloaded, click on the downloaded file titled ‘quicktimestaller.exe’ to open it. This will open up a wizard which shall complete the installation process.
- Select the Next button and you will be led to the next window regarding the terms of agreement and license.
- Click on Yes and move to the next window.
- Click on the icon that lies next to Typical to choose a setup that suits your needs the best.
- Once the setup is finished, click on the Install button, to begin with, the installation process of software. You can also check or uncheck the boxes for installing desktop shortcuts.
- Once this is done, click on the finish. You shall have successfully downloaded and installed the QuickTime player on your Windows 10 system.
An Alternative Method to Download Quicktime on PC
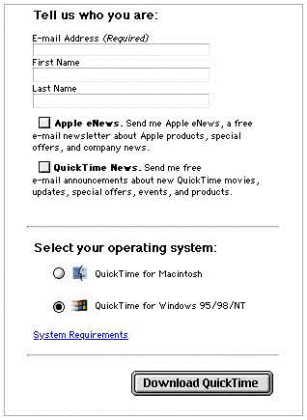
An alternative method of downloading the player on your Windows is by clicking on the http://www.apple.com/quicktime/download link. You shall be directed to the downloading window where you have two options-
- You can download a paid version of the player by paying the relevant sum of money. However, you can avoid this option for the next option.
- You can download a free version of the player for your system. All you need to do is enter your stats like your name and email address. Choose the QuickTime for Windows option and click on the Download QuickTime option.
While downloading the player on your system, you shall be given two choices-
- You can choose to go for direct installation from the official Apple website. It shall begin the process immediately.
- However, if you want the installer to be downloaded on your hard drive, you will have to wait for the downloading process. Later run the QuickTime Installer program manually on your hard drive.
Things to remember
The player supports multiple video and audio formats right from MPEG-2, 3GPP, 3GPP2, QuickTime Movie, AVI, and DV. As far as the audio formats are concerned, it supports iTunes Audio, Core Audio, MP3, etc. The player allows you to watch HD videos without the slightest of the hassle. If you wish to enjoy any HD or ultra HD movies, you are certainly in the right place.
However, while downloading the player on your Windows system, take care of a few things-
- During the installation of the QuickTime software, you must go for the custom installation. It gives you more control over the entire installation process. For instance, if you want to create or edit desktop shortcuts, you might be able to do that easily with the help of custom installation.
- There are two options. QuickTime Essentials and QuickTime Player. These are selected by default. The optional features- QuickTime Web Plug-in, QuickTime Picture Viewer, and QuickTime Java. Usually, these options are not required by the users and therefore, it is advisable to keep them disabled. However, if the functions performed by these plugins is of any use to you, you can select them as per your convenience.
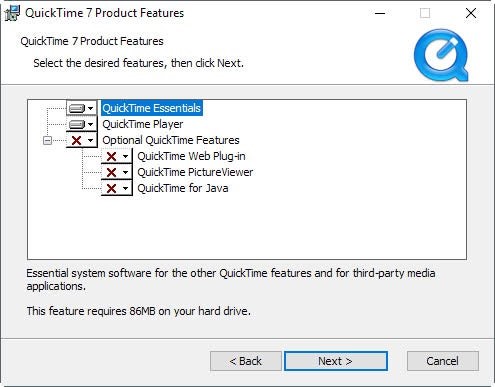
- If you are using browsers like chrome and edge, you shall not be able to use these plugins since they no longer support the installation of these. However, if you are using Firefox, you might be able to use the plugin easily.
- If you need the software for video editing, just installing QuickTime Essentials would be enough.
- Usually, there is some time lag when you download QuickTime for a windows based system and therefore, you must hold your horses and avoid clicking randomly on any option.
Updating the QuickTime player
Once you have downloaded the latest version of QuickTime player, you might have to update it on a regular basis in order to run the software smoothly. In order to update the player, follow these steps-
- If you have installed QuickTime in your Windows OS, you shall be notified about all the updates in the Programs folder.
- To access the folder, go to the taskbar and click on Start> Programs> QuickTime
- You shall be presented with a list of tasks that can be done. Select the ‘QuickTime updater’ option. Make sure that you are connected to the internet while performing the operation.
- Once the updater is launched, a wizard shall pop up and you need to click on the selected option as mentioned in the instructions.
Possible threats
As a user, you must know that downloading QuickTime on your Windows system must be done only if it is needed urgently and there is no alternative available. You are about to download a software meant for macOS. You must know that it might make your system vulnerable to threats. However, it can be prevented with the use of a secure firewall.
A boon or a bane?
Are you in a dilemma about whether to download the software or not? You must know that there is a hack that can keep your system secure from the attacks. Once you have downloaded the QuickTime player, you will notice that there are 3 programs that are installed with it.
- MyFordBenefits & Fix Your PC ran into a Problem
After you have used the player, you must make sure to remove these 3 programs from your system. To do so, follow this procedure-
- Open the Settings option on your system using the taskbar or the shortcut key.
- Next, click on Apps, and from there, select ‘Apps and features’. If you have updated to the Creator Update, then clicking on the button shall direct you to the relevant page. However, if you have not updated, you will need to go to the ‘System’ option to do the same.
- Next, click on the QuickTime option and then press the uninstall option to remove the player from your system completely.
- Repeat the same process for the other two programs as well and you shall be able to keep your system safe from any attack.
Thus, it is evident that using QuickTime on your Windows must be preferred only if you are getting regular updates for the player. Follow the steps mentioned above to use the player without harming your system.